Slack is a messaging platform used by numerous developer teams around the world for their day-to-day instant messaging interactions. Slack is a very powerful productivity tool that makes our lives easier here at Aeeiee.
Bots in slack allow us to run code to automate tasks. They can also:
- Post messages in Channels and react to activities of team members
- Have names and profile photos
- Be added to public and private channels
In this blog post, we’ll explore how to extend Slack’s capabilities by creating a Slack bot that sends out reminders a day before a team member’s birthday – so we can buy them gifts 😁. Let’s get into it!
Prerequisites
- Node.js installed
- Basic knowledge of JavaScript
- Slack
- ngrok
Setting up the bot
To get started, you’ll need to create a new Slack application. Follow this link to create one. We’ll call our app aeeiee-birthdays. I’ve also selected our internal company workspace aeeiee.

Setting up Permissions
The next step is to give our bot some permissions using slack scopes.
- Head to Features > oAuth and Permissions, then scroll down to the Scopes section.
- Click add an OAuth scope to add a new scope.
- Remember to restrict permissions to only what your app would need.
We’ve configured our scopes like this:

Now, we can install our bot to our slack workspace. To do this:
- In the left sidebar menu, navigate to Basic Information.
- Click Install to workspace to install the bot to your workspace. Select what channel you would like your bot to post to.
- Once this is done, you can head over to your slack workspace, click on add apps and search for your bot (aeeiee-birthdays in our case) to add it to your workspace.
- You can customize the icon for your app and other details by returning to the Basic information screen.
Receiving commands
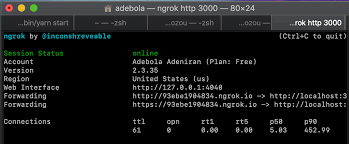
To set up our app to receive commands from Slack users, we’ll need to set up a public URL that Slack can access. You can follow the slack guide here to learn how to set up a public URL using ngrok on your local machine. Ngrok will dynamically generate a new URL each time it’s initialised.
To get a new public URL after setting up ngrok, run the command ./ngrok http 3000 from the directory where you have ngrok installed.

After Ngrok is setup:
Once you have ngrok setup, navigate to Basic Information > Add features and functionality > Slack commands. For this example, we will be creating a slack command called birthday list.
Copy and paste either of the HTTP or HTTPS forwarding addresses from ngrok to the Request URL section.

Make sure to append /slack/events to your public URL from ngrok.
Get your Bot User OAuth Token
We’ll need an access token to connect to our bot. Head to Features > OAuth and Permissions > Bot User OAuth token to obtain your token. Now, we can write the code!
Initial setup
Now, it’s time for the magic you’ve been waiting for! Time to make our bot do things! Make sure your ngrok server is running on port 3000. To run your ngrok server, run the command ./ngrok http 3000
- Create a new directory and navigate into it from the terminal mkdir aeeiee-bot && cd aeeiee-bot
- Initialize a new Node.js project using npm init -y. You can edit the generated package.json file if you wish.
- Next, we’ll need to install a couple of packages to help us with our development process.
- Nodemon – automatically restarts our server when we make changes to our code
- @Slack/bolt – Slack’s latest APIs allowing us to work with Slack apps
- Dotenv – A Node.js library to keep our environment variables secure
To install these libraries, run the command:
- yarn add nodemon -D nodemon
- yarn add @slack/bolt dotenv
Securely storing your bot token
To securely use our Bot OAuth token in our application, we will be using the dotenv library that we have installed. Create a new .env file in your root directory and add the following line in your .env file. Your bot token should start with the letters xoxb.
SLACK_BOT_TOKEN = “YOUR_BOT_TOKEN”
In the package.json file, we’ll add a new script to run our server using nodemon. Your scripts section should now look like below:
"scripts": {
   "test": "echo \"Error: no test specified\" && exit 1",
   "start": "nodemon server.js"
  }
Setting up the App
We may now begin writing the code for our application.
- Create a new file called server.js.
- Require the dotenv and @slack/bolt libraries and start the server
const { App } = require("@slack/bolt");

const dotenv = require("dotenv").config();

// Initializes your app with your bot token and signing secret

const app = new App({
  token: process.env.SLACK_BOT_TOKEN,
  signingSecret: process.env.SLACK_SIGNING_SECRET,
});


(async () => {
  // Start your app
  await app.start(process.env.PORT || 3000);
  console.log(`⚡️ Slack Bolt app is running on port ${port}!`);
})();
Fire 🔥 up the server with the command yarn start.
To listen for and receive events from Slack, we will need to set up Event subscriptions.
- From your Slack dashboard, Navigate to Features > Event Subscriptions and toggle the enable events toggler.
- Add your public URL from ngrok with the /slack/events route appended to the end of the URL.
With our app verified to receive events, we can continue building the application. First, we’ll create an array of objects to hold everyone’s birthday.
const birthdays = [
    {
        "name": "person1",
        "date": "2021-05-22",
    },
    {
        "name": "person2",
        "date": "2021-11-09",
    }
]
Next, we create a function that takes a name as an argument.
const findBirthday = (name) => {
  const user = birthdays.find((user) => user.name === name);
  return user;
};
Finally, we can write the code that listens for the command from slack.
app.command("/say-birthday", async ({ command, ack, say }) => {
      try {
        await ack();
        const birthday = findBirthday(command.text);
        const message = `Hey ${command.user_name}, ${birthday.name}'s birthday is ${birthday.date}.`
        say(message);
      } catch (error) {
        console.error(error);
      }
  });
The say() function is used to send a string response back to the Slack client. The ack() function must be called to acknowledge that an incoming event was received by your app.
Now, when a user calls our bot from a channel it is installed in, we can send them a response.
Scheduling messages with a Slack bot
To schedule messages in your app, you’ll need to give your bot channels:read and channels:history oAuth permissions. On your dashboard, navigate to Features > OAuth & Permissions > Scope > Bot token scope and select both scopes from the dropdown.
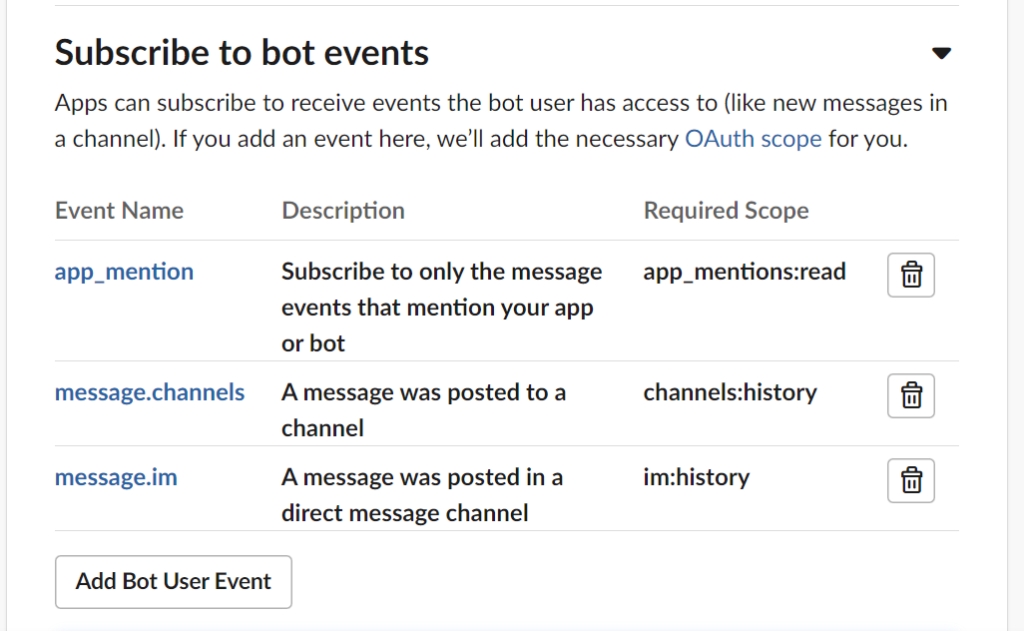
Also, make sure your bot has app_mention and message.im scopes. Navigate to Features > Event subscriptions > Subscribe to bot events

You will only be able to schedule a message up to 120 days into the future. If you specify a post_at timestamp beyond this limit, you’ll receive a time_too_far error response. Let’s schedule a message to go out. We’ll be using the moment package to help us out here.
Install the package using yarn add moment. First, we need to calculate our date in epoch time because this is what Slack recognizes.
// calculates epoch time at 9:00am GMT 1 day before birthday
const calculateDayBeforeBirthday = (date) => {
    let daysTillBirthday = moment(date).diff(moment(), "days");
    const dayBeforeBirthday = new Date(date);
    dayBeforeBirthday.setDate(dayBeforeBirthday.getDate() - 1);
    dayBeforeBirthday.setHours(9, 0, 0);
    return Math.floor(dayBeforeBirthday.getTime() / 1000);
};
Next, we can listen for a message from the Slack client. If a user mentions our bot and adds the message schedule birthdays, the function below will run.
  app.message("schedule birthdays", async ({ message, client, say }) => {
    // create empty array of async functions here
    let asyncFns = [];
    birthdays.map((birthday) => {
        asyncFns.push(async function () {
          try {
            // Call chat.scheduleMessage with the built-in client
            const result = await client.chat.scheduleMessage({
              channel: message.channel,
              // calculates epoch time for the birthday date
              post_at: calculateDayBeforeBirthday(birthday.date),
              blocks: [
                {
                  type: "section",
                  text: {
                    type: "mrkdwn",
                    text: `*Hi @channel, It's ${birthday.name}'s!! Birthday tommorow :tada: :tada:*`,
                  },
                },
              ],
            });

            await say({
              blocks: [
                {
                  type: "section",
                  text: {
                    type: "mrkdwn",
                    text: `I'll send everyone in this channel a reminder for ${birthday.name}'s birthday a day before *${birthday.date}*!`,
                    },
                },
              ],
            });
          } catch (error) {
            console.error(error);
            say(error.Error);
          }
        });
    });


    // map through the array of functions to schedule messages
for (const fn of asyncFns) {
      try {
        await fn(); // call function to get returned Promise
      } catch (error) {
        console.error(error)
      }
    }
  });
Now, when a user mentions the bot from a channel the bot is installed in, the bot will schedule a Birthday message to be delivered at 9 am on the day before a person’s birthday!
And that’s it! We can display a mentioned user’s birthday to anyone who runs the /say-birthday command. We can also schedule birthday messages by sending a message to the bot like @aeeiee-birthdays schedule birthdays.


